
Colouring with water based colour and brushes/sponges
The most important thing to remember when using any sort of colour or stain is that it will not hide a poor finish. Any torn grain will show up as spotty or blotchy darker areas - so it is worth while spending a little more time sanding. First I want to mention water based paints.
The technique is fairly straightforward -
Sand the piece to a smooth (but not highly polished) finish. I sand to about 600/800 grit (depending on the timber). If you use much finer grit, you tend to seal the surface and the paint will not spread smoothly - but on a thin piece it reduces the chance of paint 'bleeding' through to the other side.
Spray the sanded surface with water (or brush /wipe it on) and let it dry. The piece will feel 'furry' because the water will have raised the grain.
Sand it back again.
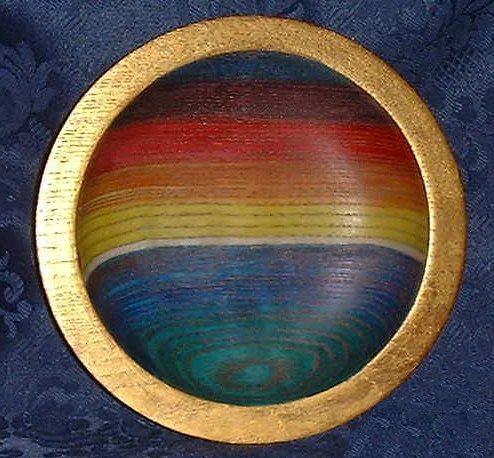
Apply the water colour. This time the grain will not raise and spoil the work as you apply the 'water'. It can be applied with a soft brush or a sponge pad for large areas and colours can be blended whilst still wet. It can also be painted with fine brushes so that grain effects can be enhanced (See the Jupiter platter).
Leave the colour to dry.
Rub back with Webrax.
Apply a coat of sanding sealer (diluted 50/50 with white spirit). If it is a solid area of colour, this can be applied with a brush or paper towel - but if areas are being left without colour, or you are using several colours close together, using several light coats of a spray on product can prevent the colour from running.
I usually use a wax finish over the sanding sealer.
Enhancing Grain with Wax
In plain wood like most Ash, the grain can be enhanced by using a coloured wax.
The technique is very straight forward. I usually do it while the piece is on the lathe as it cuts down the work needed.
Some people brush the surface with a wire brush to enhance the grain before sanding. I prefer not to. I just rely on the natural roughness and holes in the bands of spring growth. Finish the piece with sanding sealer.
Rub the coloured wax into the grain. I usually use my fingers to push the wax into the grain - but if you don't like wax under your nails, wear a rubber glove!
Leave the wax to dry for at least an hour.
Apply paste wax to the surface and spin the piece on the lathe, rubbing the softened, coloured wax off the surface of the piece. If it all does not come off the first time, apply more paste wax and repeat until the coloured wax is only visible in the grain and the piece has a good lustre.
Once again, this technique will show up areas of raised end grain and you should try to get the best finish you can before waxing. Coloured wax is available in gold, copper and silver as well as black and white (liming) and a variety of browns. There are also some brightly coloured waxes coming on to the market.
Making your own coloured wax
A greater variety of colours can be obtained if you mix a pigment into some plain wax. I have tried it with liming wax as the base. You can also mix the colour into clear wax. The liming wax gives soft tints – the clear wax does not change the colour of the powder. Don’t mix up too much as it dries out quite quickly.
The pigment needs to be something that does not dissolve and stays in suspension in the wax. I have found that ‘Earth pigments’ (available in good art and craft shops) work as do the fine powders used to gild picture frames, clocks etc in the past. Product details of things that I use are in the products list I put together. If you wish to have the list email me. Please note the disclaimer at the top of the list.
Air Brush colouring
The first tip is to invest in the best airbrush you can afford. It is possible to get cheap air-brushes – but they can be very frustrating to use!!!!! You get what you pay for in this life!
My second tip is to get an air-brush with a paint reservoir on the top rather than one you have to screw a jar underneath. They take less colour at a time, but they allow a huge amount of flexibility and you can mix new colours in the reservoir as you progress through the project. For delicate small jobs (which are usually what you want on a piece of woodturning) you can use just a few drops of paint at a time – so the reservoir makes the air-brush more economical as well.
My third tip is to invest in a purpose built stand/ cleaning kit for the air-brush. These sturdy containers allow you to spray excess paint from the air-brush reservoir and to pass water or cleaning medium through it between colours as the tip of the air-brush is contained within the lid by a rubber gasket. There is a filter on the lid to trap anything as the air escapes. If you spray a short burst of air-brush cleaner (something like liquid xylene) into the container at the start of the job, then the airbrush will not clog and need stripping down and cleaning if you have to leave it for a few hours. I have actually left mine for days on a couple of occasions.
I have tried a number of water based air-brush paints but have found the best to be a make called ‘Golden’. These are sold in sets of 12 opaque and 12 transparent colours in small plastic bottles with ‘dropper’ lids. You need so little that the cost of the set is very reasonable. The ones I bought over 8 years ago are still liquid and the right consistency. It is possible to get larger quantities of the colours you use most and use the larger pots to fill up the small ones as you need to. They mix well in the reservoir and so-far have resisted fading (8 years).
I find I get best results on work that has been sanded and then coated with a thin coat of sanding sealer – as this stops the colour from running through the grain by capillary action. I use a spray finish to seal the colour such as acrylic sanding sealer or one of the lacquer/ melamine finishes.
If you want a very high shine and sand to 1500 grit or more, the paint will not spread evenly on the surface without sanding sealer. Putting a few drops of air-brush medium in the paint helps it to spread without forming droplets. The important thing to remember is to spray very little at a time and let it dry before adding another coat.
Always start the air-brush off the work (it will normally splatter for a moment) and bring it onto the work when the colour mist is even.
Ebonising
Ebonising (painting it or staining it black) can be a very effective technique to show up the form of a piece or to add drama and impact.
Some wood can be very plain and ebonising can add value! Some
reasonably plain wood is enhanced if it is ‘framed’
by an ebonised section – especially, in my mind, if it has
a super, deep, glossy finish – but that is all about
personal taste!
Ebonising spray is easy to use and can be done on smooth or
textured surfaces (but it doesn’t hide a bad surface!!!!).
It is a good idea to protect your lathe and chuck if you spray a
piece while it is turning.
Ebonising is also a splendid background for pushing coloured wax into the grain (see earlier) and for using interference or iridescent paints (to follow).
Adding Sparkle
Look out for cross-over from other crafts. Rubber stamps can be used with glue instead of ink and then fine glitter powder can be sprinkled onto the glue and the surplus dusted off when it is dry. Even randomly drawn glue trails over a piece can be most effective. It helps the longevity of the piece to finish with a spray lacquer /melamine finish to fix the glitter so it does not come off with handling.
You can get spray lacquer with tiny pieces of glitter in it. This is very effective, especially on a textured surface. It comes in gold, silver and copper (see list).
Adding Iridescence
There are paints on the market called ‘interference paints’ that completely disguise a blackened surface. This is useful if your piercing tool carbonises the inside of the cut and you do not want the pierced pattern to stand out and don’t fancy hours of details, delicate sanding. A brush ‘lightly’ charged with interference paint, gently run around the carbonised inside edges leaves enough paint to disguise the black and leave an iridescent shimmer in its place. You then lightly sand off any paint that has dried on the face or back of the piece.
A company called ‘Jo Sonja’ make a good set of iridescent colours that you use anywhere on a piece to give a stunning finish. They work best against a dark background. They look white as you paint them but dry to their iridescent colour. (My favourite is the purple on an ebonised surface).
Crackle effects
I once went to a lecture about paint drying and, I kid you not, it was fascinating. A huge amount of chemistry is involved in getting paint to do its job and companies spend huge amounts researching new products.
One kind of paint that can be used to give very interesting effects is crackle paint. As it dries, it shrinks and cracks, giving it an ‘aged’ and very interesting appearance. It seems that the thicker you use the one-stage products, the bigger the ‘crackle’ Less than 1mm thick gives a fine crackle and 2mm gives big crackles – but they seem less well fixed to the surface and need a few coats of lacquer to protect them from flaking when handled. It is a beautiful and attractive textured surface though and requires very little skill or effort – always a bonus! The Jo Sonja system included two crackle mediums. How to use them is covered in my Decorating Technique notes which I will send by email on request.