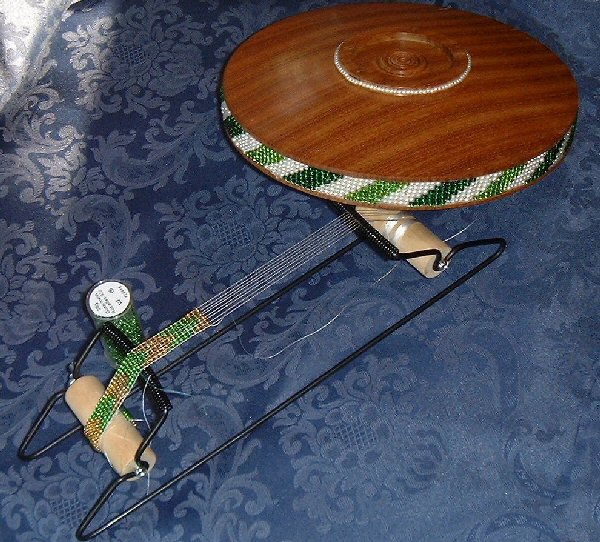
Beads are very tactile. They can be strung very simply or woven into complex patterns, either by hand or on a bead loom.
The first beads I used on my turned pieces were single strings that were stuck into a recess made in the piece with a parting tool. I found it best to string the beads on transparent thread and glue a section at a time, holding them fast with low tack masking tape while the glue dried.
The glue I use is a high tack, fast grab glue that dries clear and has some flexibility. This kind of glue can be bought in most good craft shops. The brand that I am currently using is called 'Hi-Tack'.
This is where it starts to get a bit complicated to explain - I found that these strings of glass beads looked better if they had an associated wooden bead either side of the groove.
For these wooden beads on my platters I use Ashley Isles beading tools. I keep the cutting edge sharp by using a diamond file between each cut. The whole of the bead is formed at once, so both sides of the bead are being scraped at the same time. If you rush at it, it is easy to tear the grain on top of the bead. I have found the secret to perfect beads every time on the timbers I usually use _English hardwoods like elm, ash, sycamore and beech), is to gently rock the tip of the tool up and down with my fingers underneath the handle whilst scraping and to stop just before the centre of the curve engages with the wood. Alternately, lifting the handle of the tool as you get to the centre of the bead also works. Sanding will smooth out the curve and you should find that the grain does not pull out.
I have also found this technique successful on oak and maple. I have also tried it on some exotics (Amarillo, padauk purple heart and ebony), but I use them rarely. The speed needs to be as fast as you feel comfortable with - the faster the better. On thicker platters I use two wooden beads to contain a single row of glass beads on the edge of the rim - or to frame a ribbon of beads that I have designed and made on a bead loom. The ribbon needs to be made to fit the circumference of the bowl exactly if it is a complex pattern - but there is usually a small amount of play in the bead work, so making it a fraction short and easing the beads to fit the space usually works well.
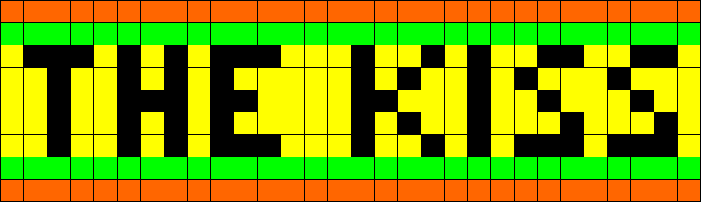
I design the bead ribbons on a grid - then follow the pattern to string the beads together. It is even possible to put text into it and I created my Garden platter to have a complex bead ribbon on the edge which has the following woven into it :
The Kiss of the Sun for pardon,
The song of the birds for mirth.
You are nearer God's heart in a garden
Than anywhere else on Earth.